
Z31/prw2 php
Auto-imported article. This page was generated by the Z31 Library import pipeline from forum sources{{#if: | in category {{{category}}} | }}. The text was synthesized by an LLM and has not been hand-verified. Please correct errors and remove this banner once reviewed.
{{#if: | [[Category:Auto-imported — {{{category}}}]] | }}
Z31 Nissan PRW-2 Ignition Upgrade
This is a pretty simple modification for a more reliable spark for your Z31. This upgrade can also be used on the S130 by following the method with the 2-wire unit.
What is a PRW-2
This PRW-2 install guide pertains to the following item, which goes by several names:
- Power Transistor Unit
- Ignition Control Module
- Ignitor Chip
- Ignition Transistor
This is the transistor that charges and discharges the ignition coil. It can be found on a number of distributor-equipped Nissans.
Interchange
Where to Find a PRW-2 Unit
You can get a PRW-2 unit from any of the following models:
- INFINITI M30 (1990 – 1991)
- NISSAN ALTIMA (1993 – 1997) — Located under the airbox
- NISSAN AXXESS (1990 – 1992)
- NISSAN D21 PICKUP (1990 – 1994)
- NISSAN MAXIMA (1989 – 1994) — Located near the distributor on a bracket
- NISSAN NX (1991 – 1993)
- NISSAN PATHFINDER (1987 – 1995)
- NISSAN PICKUP (1995 – 1996)
- NISSAN PULSAR NX (1989 – 1990)
- NISSAN SENTRA (1989 – 1994)
- NISSAN STANZA (1990 – 1992)
The unit you’ll be sourcing looks like this (PRW-2, but there is also a similar-looking PRW-1A):
image: Nissan PRW-2 Ignitor Module
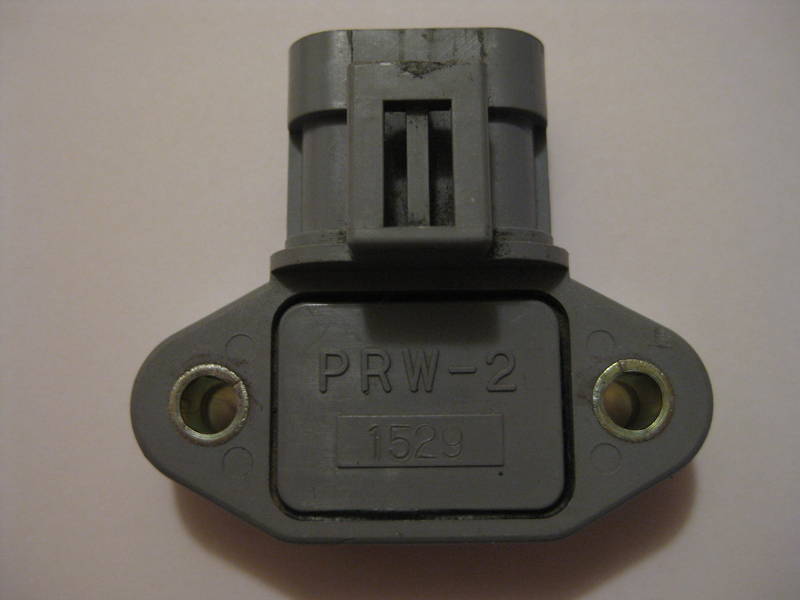
PRW-2 ignitor module (some units may be labeled PRW-1A but look nearly identical)
PRW-2 Install: Pin Swap & Mounting
On the Z31 harness, located on your driver-side strut tower behind the headlight (where the main ignition components are), you will find your current PTU.
image: Factory Z31 Power Transistor Unit (PTU) Location
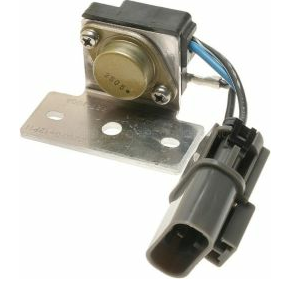
The PRW-2 is not exactly plug and play, but it’s close. The issue with the newer PRW-2 is that two wires have been flipped, or two contacts need to be swapped on the Z31 harness. The procedure is simple and is outlined below.
- Remove the black housing clipon the back of the Z31 harness gray connector to expose the seals on the back of the wires.- You do not interact with or poke the seals.
- This step just allows you to pull the wires out.
- Swap the black wire with the green/white wire.This is the only change needed to the harness.
Pinout:- Blue – Signal to Coil and Tach
- Green – Signal from ECU and CAS
- Black – Ground
Note for early '84 models: If you had the 2-pin Power Transistor, you’ll need to swap over the later style connector. The wires are the same, but you are missing the black ground in your harness—so you must add a chassis ground to the black lead after swapping the pins.
image: Early 84 Connector Wiring
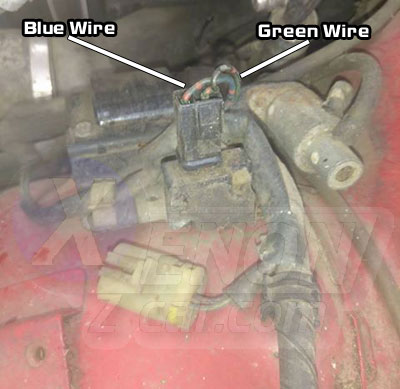
How to Remove Pins
Insert a safety pin into the small rectangular hole just above the head of each contact pin from the inside of the connector. Lay the pin flat on top of the connector contact and slide it in gently until it stops.
Do not force it—gently pry downwards to move the retainer inside the connector up and away from the pin, while gently tugging the back of the wire.
Do not use generic pin removal tools; they are usually too large, too thick, or not long enough.

Final Installation
Once you’ve swapped the wires, you can then plug and play. Just find a good mounting location in the same area, ensuring you have solid metal-to-metal contact for proper heat sinking.

Benefits
The benefits of this modification include a smoother idle and quicker throttle response, as the PRW-2 uses a newer and faster transistor. As our cars get older and parts become more scarce, this upgrade will likely become even more common. Even aftermarket companies are beginning to replace the old part with the PRW-2, often including a small sub-harness to handle the wire swap for you.
Sources Used
1984-1988 Nissan 300ZX Factory Service Manual- Modification found by: Michael Palladino - Images by Careless, Z_Karma, TearingRave, Rockauto.com - Early transistor image by: Carrick Kendrick Video from The Z Garage